148. zsh + powerlevel10
安装
安装 zsh
安装
1 | # macOS |
切换
1 | chsh -s /bin/zsh |
安装zsh框架
选择其中一个安装即可
安装 oh-my-zsh
1 | # mac |
安装 zim
安装
zim。1
curl -fsSL https://raw.githubusercontent.com/zimfw/install/master/install.zsh | zsh
编辑 Zsh 配置文件
~/.zimrc:1
vim ~/.zimrc
在文件最后加入下面的一行文字,以添加
powerlevel10k模块,然后退出。1
zmodule romkatv/powerlevel10k
安装
powerlevel10k模块,在终端输入如下命令即可。1
zimfw install
安装之后,
powerlevel10k会让你进行配置。在此时配置时,很多图标符号看不到,因为
powerlevel10k中包含许多特殊图标符号,需要与之兼容的字体。
安装 powerlevel10K 主题
安装主题
方法1 (推荐)
1 | git clone --depth=1 https://github.com/romkatv/powerlevel10k.git $ZSH_CUSTOM/themes/powerlevel10k |
方法2
1 | cd ./.oh-my-zsh/themes |
配置主题
~/.zshrc 设置如下内容, 以使用p10k主题
1 | ZSH_THEME="powerlevel10k/powerlevel10k" |
插件
语法高亮插件
1 | cd ~/.oh-my-zsh/custom/plugins/ && git clone https://github.com/zsh-users/zsh-syntax-highlighting.git |
自动补全
1 | cd ~/.oh-my-zsh/custom/plugins/ && git clone https://github.com/zsh-users/zsh-autosuggestions |
自动跳转
1 | # mac |
zshrc 配置插件
oh-my-zsh框架
接下来 ~/.zshrc 在插件配置处添加下载的这两个插件名
1 | plugins=( |
另外, 时间戳改一下格式
1 | HIST_STAMPS="yyyy-mm-dd" |
zim框架
mac
1
[[ -s /usr/local/etc/profile.d/autojump.sh ]] && . /usr/local/etc/profile.d/autojump.sh
linux
ubuntu
1
[[ -s /usr/share/autojump/autojump.sh ]] && . /usr/share/autojump/autojump.sh
archlinux
1
[[ -s /usr/share/autojump/autojump.bash ]] && . /usr/share/autojump/autojump.bash
[!ERROR] /usr/share/autojump/autojump.bash:34: command not found: complete
在.zshrc文件中添加以下命令1
2autoload bashcompinit
bashcompinit
安装依赖字体
运行 p10k configure 向导模式进行p10k的主题定制
完成后会生成一个配置文件 ~/.p10k.zsh,并且在 ~/.zshrc 中自动加入了
下载字体
推荐 JetBrainsMono Nerd Font
网站
-
推荐
JetBrainsMono Nerd Font, 点击下载(v3.0.2) -
1
2
3
4
5mkdir fonts
curl -o ./fonts/MesloLGS\ NF\ Regular.ttf https://raw.githubusercontent.com/romkatv/powerlevel10k-media/master/MesloLGS%20NF%20Regular.ttf
curl -o ./fonts/MesloLGS\ NF\ Bold.ttf https://raw.githubusercontent.com/romkatv/powerlevel10k-media/master/MesloLGS%20NF%20Bold.ttf
curl -o ./fonts/MesloLGS\ NF\ Italic.ttf https://raw.githubusercontent.com/romkatv/powerlevel10k-media/master/MesloLGS%20NF%20Italic.ttf
curl -o ./fonts/MesloLGS\ NF\ Bold\ Italic.ttf https://raw.githubusercontent.com/romkatv/powerlevel10k-media/master/MesloLGS%20NF%20Bold%20Italic.ttf
安装字体
linux
1
bash ./install.sh -of
manually
- Unzip the archive (解压)
- install the font (安装)
- macOS
Select all font files in the folder and ==double-click== the “Install Font” button. - Windows
Select all font files in the folder, right-click any of them, then pick “**==Install==**” from the menu. - Linux
Unpack fonts to~/.local/share/fonts(or/usr/share/fonts, to install fonts system-wide) and ==fc-cache -f -v==
- macOS
- Restart your software and choose the font
设置字体
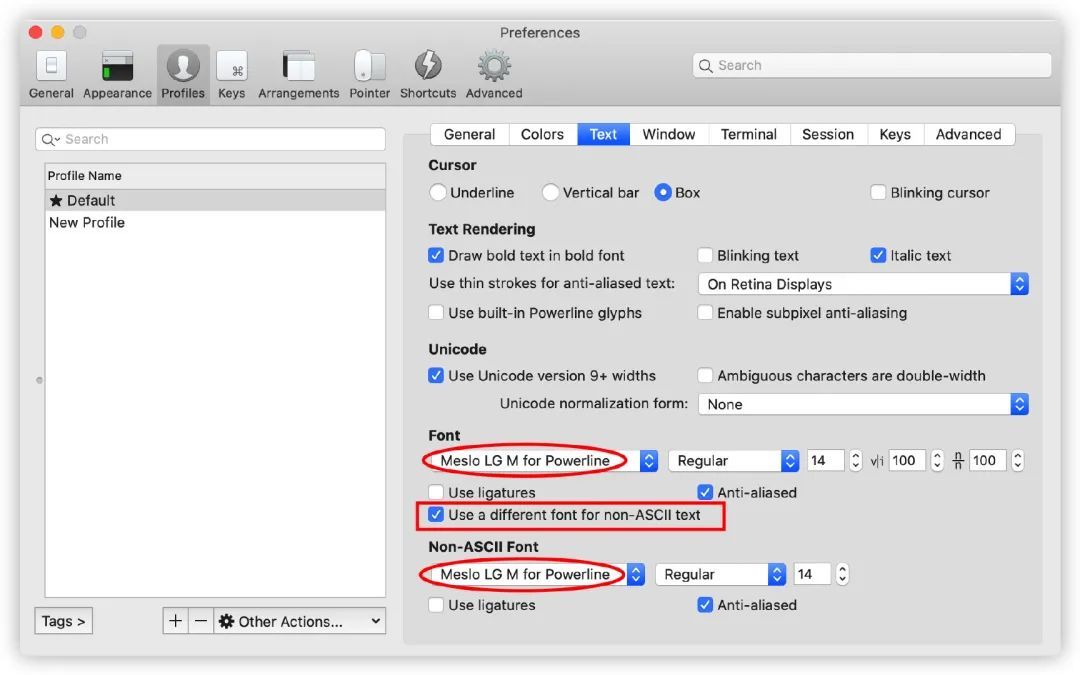
从Profiles -> Open Profiles -> Edit Profiles -> Text修改字体。红色矩形框勾选,字体其实有好几个,至于用哪个Powerline结尾的都行,只是大小和间距略有不同。

快捷键
| 快捷键 | 功能 |
|---|---|
⌃ + u |
清空当前行 |
⌃ + a |
移动到行首 |
⌃ + e |
移动到行尾 |
⌃ + f |
向前移动 (front) 前面 |
⌃ + b |
向后移动 ( before )在某某之前 |
⌃ + p |
上一条命令 ( prev ) |
⌃ + n |
下一条命令 ( next ) |
⌃ + r |
搜索历史命令 |
⌃ + y |
召回最近用命令删除的文字 |
⌃ + h |
删除光标之前的字符 |
⌃ + d |
删除光标所指的字符 |
⌃ + w |
删除光标之前的单词 |
⌃ + k |
删除从光标到行尾的内容 |
⌃ + t |
交换光标和之前的字符 |
⌘ + Click |
可以打开文件,文件夹和链接 |
⌘ + n |
新建窗口 |
⌘ + t |
新建标签页 |
⌘ + w |
关闭当前页 |
⌘ + 数字&⌘ + 方向键 |
切换标签页 |
⌥⌘ + 数字 |
切换窗口 |
⌘ + enter |
切换全屏 |
⌘ + d |
左右分屏 |
⇧⌘ + d |
上下分屏 |
⌘ + ; |
自动补全历史记录 |
⇧⌘ + h |
自动补全剪贴板历史 |
⌥⌘ + e |
查找所有来定位某个标签页 |
⌘ + r&⌃ + l |
清屏 |
⌘ + / |
显示光标位置 |
⌥⌘ + b |
历史回放 |
⌘ + f |
查找,然后用tab和⇧ + tab可以向右和向左补全,补全之后的内容会被自动复制, 还可以用⌥ + enter将查找结果输入终端 |
QAs
warning: completion was already initialized before completion module. Will call compinit again. See https://github.com/zimfw/zimfw/wiki/Troubleshooting#completion-is-not-working
- archlinux 运行命令:
echo 'skip_global_init=1' >> ~/.zshenv - ubuntu 运行命令:
echo 'skip_global_compinit=1' >> ~/.zshenv
- archlinux 运行命令: